Saturday, September 28, 2013

408 Stroker Research


September 2013

408 Stroker Engine Research

I am planning on building a street car, a strong running street car. I do not plan on racing this car, just some spirited driving around town.  I know the Cleveland engine is strong in its stock form, but I would like a little more oomph and I would like to use my 4V closed chamber heads as well which I know are not good performers on the street unless you rev to the upper limits or you throw some more cubes at them.  So, with the comparable cost to machine work with all the stock components and the stroker kit, I decided to go with the stroker to help those 4V’s breathe a little better for me.  Sub-frame connectors are already welded in to help handle the added torque and HP. 
I have talked to a few of the parts distributors and read several forums with people talking on this subject of what to put into your 408.  I will not be racing this car so H beam rods are not necessary, or a forged crank.  The 9000 series cast crank will hold up just fine for what I will be doing with this car.  It will have roller rockers, but as of this writing I am still unsure of cam specs.  That is the last thing that I need to figure out.   
I had to buy a replacement block as my original block had already been  into by someone and bored .030 already.  It had two very rusty cylinders, one of which would have needed a sleeve so I just chose to find an unmolested block to start with and plan on keeping the original as it is. My donor block is yet to be unassembled but with the purchase very soon of the stroker kit I will be tearing it apart and taking it to the machine shop to start its new life.  The original 4V closed chamber heads will also be joining the block soon with the machinist. 
Here are a few highlights of my plans, not in any particular order…and these are just ideas, not all of them are set in stone yet

Heads

·         4V factory iron heads
·         Only deck enough to flatten
·         Roller Rockers
·         Port match with intake manifold and gaskets
·         Clean out, smooth up exhaust ports, do not polish
·         ARP head bolts
·         Hardened valve seats
·         3 angle valve job
·         Stainless steel, single groove valves. 
·         Bronze valve guides
·         New valve springs, retainers,  locks and steel spring seats
 
Block

·         Bored .030 over
·         ARP Main Cap bolts
·         High volume oil pump with chromoly shaft
·         Rear sump pan
·        Decked


Crank

·         9000 series cast crank   
·         Dynamically balance with flywheel and damper, 28 oz. balance 
 

Pistons

·         Forged pistons  -16 cc dished (stroker kit)
·         New rings (Total Seal Gapless)  (stroker kit) 

Rods

·         Forged I Beam 6” (stroker kit)
·         ARP rod bolts (stroker kit) 

Cam

·         Hydraulic flat cam, custom grind by Jerry Wilson
·         Roller rockers 
·         Push rods.    
·         Double roller timing gear & chain--32 to 34 total advance with about 18 to 20 initial timing?


Intake manifold

·         Edelbrock Performer
·         Port match with heads and gaskets
·         ARP manifold bolts
·         Holley 750 cfm, with electric choke
·         Electric fuel pump
·         1” carb spacer, Airflow Research (tapered 4 hole) or open phenolic
 

Ignition

·         MSD Digital 6A PN# 6201
·         MSD Distributor # 8477 or 83501with steel gear (# 85813)
·         MSD Blaster 2F Coil

 
Exhaust

·         Ceramic long tube headers, 1 3/4” primaries and 3” collectors
·         Cross-over H pipe right behind transmission
·         Magnaflow  mufflers

Tuesday, August 6, 2013

August 2013 Update

Very sad news, dad passed away in May of this year.  It was unexpected and has been a tremendous setback for all of us.  Needless to say the Mustang project has been put on hold for awhile.  I still have ideas and talk about it and such but the work has ceased for now as I have been very busy helping mom with things around her house.


If it were not for dad passing I would have hired a new painter to throw the color on this summer, as I was not really needed for that work.  I will get back to work soon on this project, maybe this winter.  My plan for now is to take the block and heads of Cleveland down to the machine shop this winter and get all the work done I am planning and then start the assembly of the power plant. 


The T5Z is ready to go with a fresh rebuild, and also the rear has a fresh set of 355 gears in it so these things are ready to go already.


I have been looking and toying with different ideas for the interior, and I still have not made up my mind quite yet.  I am pretty sure I will not be using the stock seats even though I already have new stock Mach1 seat covers.  Definitely something different for the console as well if I even put one back in.  I really do like the clean look of no console.  The door panels are another subject, I think I might go to my local custom interior shop and see what sort of ideas they might have for me there.


To all those who have been checking on this project, thank you and I will continue with updates when the work begins again. 


RIP Dad...you are missed.  We love you!!!

Thursday, March 7, 2013

Winter Work Slowdown

January, February, and the first part of March have been frustrating so far as far as getting anything done.   The weather hasn't been too cooperative. 

So, while we wait, me and dad have been doing some sandblasting of small parts and just some general cleanup around the shop.


I have been ordering a few new items, parts and whatever I can think of to start putting this project back together once the paint is on.


Here's a shot of some of the recent weather we have gotten.  I believe we got over 14" of snow before this storm was finished with us.
 

Thursday, February 21, 2013

POR15 Application


Jan 2013
Rust removal and rust protection is key when rebuilding and old auto, it doesn’t matter what kind of car it is.  There are several products out there that are available to the consumer for rust protection, I chose to use POR15 solely based on the opinion of others I have talked to and their experiences with previous use of the product.     This resto won’t be seeing much moisture anyway.  I plan on driving the car, but never in any sort of weather.
We have been applying POR15 for several months now.  So far the POR15 has been a great product to use, easy, simple to apply and seemingly very efficient at what it does.   We have used it almost everywhere on the car except for outside panels that will be painted with color.   The entire underside and the inside areas have been coated, also parts that will be bolted back on have had an application as well.  We have used 1” throw away brushes and 2” foam rollers to apply all the POR15.  Larger flat areas were perfect for the foam rollers while the smaller, tighter areas had to have brushes to complete the coverage.  It can be sprayed as well but we were always applying as we worked in smaller areas so the brushes and rollers fit the job more appropriately for us.  
After trying to sand blast some of it off a few parts that were mistakenly coated I am very confident that nothing that happens in the lifetime of this car will allow any rust to rear its ugly head again.  This stuff is one very tough product.
These are just a few of the applied areas, there are several other parts that have been coated that are waiting on their turn to be painted and put back on the car.
 
 
Inner wheel house before it was welded back in for that extra 2" of clearance for the rear tires.

Passenger side front frame rail and transmission tunnel support before floor pans were welded back in.
 

A-1, First Class, Master Welders.  At least our hats think so!!!   :)
Me and Dad

Front end coated.

Again the front.

Inside of the fire wall, and I have decided to lose the original wiring harness and go with some "Painless" copper.

Original 9" rear end.  New gears though, "3.55"

Looks nice, dad must have applied this coat.

New custom outer wheel house and trunk close out.

New custom outer wheel house and trunk close out.

New floor pans after welded in and before seam sealer.

No rust allowed!!!

Getting ready to bolt on the new front end components.

Anti sway bar, front frame rails, cross member.

Engine is looking pretty good.

In push mode, I still need to get that last quarter welded in place.


Wednesday, February 20, 2013

New Front End Install


Jan 2013
Finally—time to start bolting on some of the new front end parts, although it will be temporary as most will have to come back off for painting the engine bay and inner fenders.  For right now though, we need it on to move the car around and get it over to paint.   Working in some colder weather for this bolt on type stuff is no big deal, just a good pair of work gloves to keep the frigid tools from chilling our fingers to the bone and the doors shut on the shop to block the wind and we’re all good. 
The new cross member had already been welded in place months ago and work on cleaning up the looks of the engine bay was pretty much complete.  One thing I missed when welding in the new side panels for the engine bay was leaving enough clearance in the side panels to allow access to install the upper A arms.  I had only left enough clearance for the A arms to work after installation.  Of course we discovered this as one the first things to bolt on would be the new upper A arms.  The remedy for this situation was not all that difficult, and only set us back by one day but none the less left me less than happy.  It flat out pissed me off!!
The fix consisted of me cutting part of my new engine bay side panels out and welding them back into place once the Upper A arms were installed.  The welds have been grinded smooth now and are ready to be filled and smoothed along with a few other things in the engine bay that need tidying up.  When the front end is unbolted and removed for paint, the upper A arms will have to stay in place and be dealt with (paint around them) as they can’t be removed from the car now without cutting the sheet metal again. 
Lower A arms, Upper A arms, Adjustable coil over shocks, power rack and pinion, anti sway bar and steering links pretty well rounds off this install.    
To get it back rolling again we already bolted on the rear end with just the leaf springs so we could put the old wheels and tires back on.  No new brakes, shocks or anything back there yet.  The front end, however with the new larger disc brakes will not accommodate the old wheels.  The wheels hit the new calipers and the pitmen so we set off to find a solution.  What we decided on was an easy fix without spending any money, first we took the calipers off.  With no hoses hooked up yet for the brakes this was a simple matter and they were placed off  to the side for later.  To deal with the wheels hitting the pitman we just used some washers stacked up as shims behind the wheel to move them out a bit. 
We are now ready to roll…
 
New front end as it came delivered, Christmas in August!!
 
Getting ready to bolt on some of the new stuff.
 
Old Ford Engineering


Factory power disc brakes.

Before  

New upper and lower A arms, coil overs and disc brakes. 

Temp install, will have to remove for paint.

Here you can see the notch I had to cut above the upper A arm to allow installation of A arm.

Anti Sway Bar, lower A arms, power rack and pinion.
 
 
Power rack and pinion, anti sway bar.
 
Common vantage point.
 
View from the inside.
 
 
Driver side engine bay panel with notch cut out to fit upper A arm.
 
Passenger side engine bay panel with notch cut out to fit upper A arm.
 
 
Back side of engine bay panel, getting ready to weld notch piece back in.  Using this piece to back up the piece that was cut out.


Inside of engine bay panel, getting ready to weld notch piece back in.  You can see the gap to allow welding between the panel and the notched out piece with patch in behind backing it up.  I will be connecting all three pieces with weld for a solid fit.


Welded in.  Not pretty but this steel is galvanized so it is tough to weld.


Welds ground down here, ready for Duraglas.
 
Rear end getting bolted into place.  New leaf srpings for now is all.  The rest will come after paint.  The rear end itself has been media blasted and coated twice with POR15.
 
Rolin...
 
Rollinnnn...


Wednesday, January 16, 2013

Remove and Replace Floorpans

(July 26th, 2012)
Time to cut out the floor pans.  While accessing the stock floor sheet metal I had decided I would need two full sides, not a complete floor pan.  (Driver and passenger, front and rear of both) Including the seat pans as they were quite rusted out on the front wall of the pan.  The transmission tunnel was still in very good shape.  So I ordered a pair of new full length floor pans and new seat pans.  I used a cutting wheel on a 4” electric grinder to do the removal and have used this tool as a weapon on rust removal quite a bit in this rebuild.   We keep three grinders in the rotation, one for a cutting wheel, one for a grinder, and one for a wire brush, so much easier than switching out the devices of torture.
We placed the new floor pans down in the car and pushed and shoved for best fit and to mark where to cut out for removal, giving ourselves plenty of extra material for any mistakes and trimming later.  They will need a little massaging here and there, but overall not all that bad of a fit.  There was only one area behind the gas pedal that will require an extra patch be placed that the new pans didn’t cover.  That is right where the cowl was leaking under the dash, straight down onto this area.  I cut the periphery with the cutting wheel and then used a grinder to thin the metal on the spot-welds around the frame rails and other areas.  After that I just used a chisel to knock the spot-welds loose.  All the rust in the floor is gone now. 
(10/24/2012) I still have not welded in the new pans, having them out has given convenient access to other projects along the way.  We’ll get to them soon as we are starting to get closer on wrapping up some of our other fab projects on the car.  Knowing that Thanksgiving and Christmas is coming soon and the cold weather, we know our progress will be slowed somewhat now.
(1/7/2013)  We made it to the New Year!  Yeah!!!  The holidays and the weather have slowed us up some just as we knew they would but we have been steadily working on the car when the opportunity presents itself.   Continued work on smoothing the firewall, continued work on welding in new quarters, continued work on applying POR15 to areas, and finishing the work on welding in the floor and seat pans.  Very soon it will be time to take the shell off of the raised work cart and lower it onto jack stands, then put the rear end back on and bolt up the new front end making it a roller so we can send it off to Todd for final body smoothing. 
In completing the floor pans we traced along the edges of the front frame rails so we could drill holes in the pans to allow welding to the frame rails.  The rest of the pans were welded in using stitch welding all the way around the edges, the same was done with the seat pans.  There were two areas that the new floor pans did not cover on the driver side after cutting out the rust.  Those two areas had to have patch panels made to fit after the pan was welded in.  After getting the rough fit on the patch panels and you begin to weld them in, the heat from the welding allows easy forming to fit the existing metal perfectly.
The seat pans fit very nice on top of the floor pans and the seat bolt holes between the seat pans and floor pans all lined up very good.  The seat pans were welded into place and all the welds were touched up with a grinder just to smooth a bit of the roughness out.  Seam sealer will be applied inside and out to make a good watertight seam before undercoating goes on outside and Dynamat on the inside.

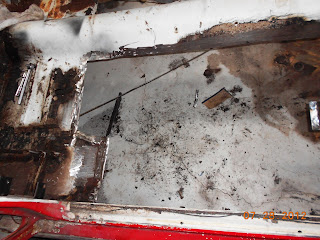
 A general view of the rusty floor pans.  If you look close you can see the fiberglass repair someone did on the driver's side.

 On it's way to becoming one of the Flintstone's cars.

 Here's a better look at that fiberglass repair on driver's side.

 Unlucky for me, this is where I found my build sheet, only a corner of it survived.

This is one very rusty floor.  After 20 years of sitting outside in the elements with a leaky cowl you can see the results.  Here you can see the driver side seat pan has already been removed.  Dad got after it with his hot wrench.

 A quick test fit of the pans just to satisfy the anticipation factor.

 July was still pretty toasty here in Kansas. 105 degrees

 Frame rail right after removal, before any cleanup.  Notice the floor, all the rusty junk and pieces.

 Driver's side rear before cleanup.

 Passenger frame rail before cleanup.

 Passenger rear.

 After a bit of cleanup.  You can also see the inner wheel houses have been removed in prep of minitubbing.

 Passenger side after a bit of cleaning.

 The scrap pile is building...and it is getting even larger now with added pieces. Shock towers, rear quarters, etc...

 Cleaned and coated with POR15.  Here also is a better look at the Global West subframe connectors.

 After fitting, we marked the bottom around the frame rails to punch a few holes for welding to frame rails.

  After fitting, we marked the bottom around the frame rails to punch a few holes for welding to frame rails.

Welds on the frame rails and the stitch welds around the periphery.  You can also see areas that still require patching that the new pans did not cover.

 A closer look at the frame rail welds and the area needing patched.  This area is directly under the hole in the cowl, and was nothing but rust. 

 Stitch welding around the back of pans.

 Here is the smaller patch that is right on the transmission tunnel.

 Before patching.

 After patching.  I started the form on this piece of cold sheet meal and got it close to fitting, then started the weld.  As the piece was warmed it was quite easily worked into a perfect form fitting patch.

 Both patches after welding in.


 Dad cleaning up a few of the welds.  You can see the seat pans are already in.   The seat pans went in very nicely.  I was very pleased with their fitment.
 Welds have been smoothed and floor is ready for another coat of POR15 and some seam sealer.


  Welds have been smoothed and floor is ready for another coat of POR15 and some seam sealer.

  Welds have been smoothed and floor is ready for another coat of POR15 and some seam sealer.

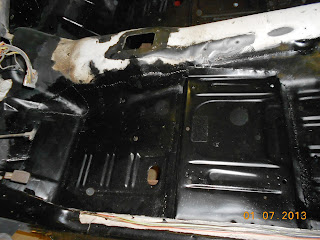
 POR15 applied, next is the seam sealer which went on very nicely.

 More POR15.  That is some very tough stuff!!  Careful where you apply it, you don't want to get it on anything you're gonna strip later.  Even the sand blaster struggles with removal.

 Overall shot with POR15 applied.

 3M Brushable seam sealer.  Another great product, easy to use, covers very well.

 3M Brushable seam sealer.  Another great product, easy to use, covers very well.

 3M Brushable seam sealer.  Another great product, easy to use, covers very well.

 So very thankful to have this dirty, rusty part of the resto completed.