Monday, October 22, 2012

Finding the Build Sheet, June 5th, 2012


During the interior removal I was anxious to find that build sheet, and with the rust and the 20 years of exposure to the elements I was hoping it would be up under the back seat safe and sound in the springs.   It wasn’t there when we took out the back seat so I wasn’t too hopeful we’d find it in any kind of good condition.  The carpet was still in as we were laying on it to pad ourselves while working the inside still, so as it came out that rusty, dusty, crusty build sheet was spotted.  It was tucked up under the passenger side carpet, and up over the seat pan.  Almost all of it was rotted and gone, all except the portion up on the seat pan.  I carefully peeled it out of its resting place and placed it in a plastic sleeve, the remains that is.  Here’s a few pics.
 
 
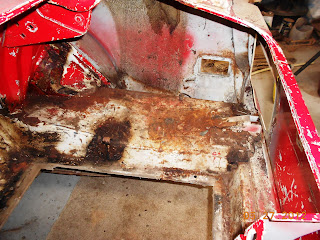
This is the passenger side floor pan, a very rusty mess that you could step right through.

The original resting place for the build sheet, front side of the passenger seat pan and floor.  This part that is still barely legible was laying up on top of the seat pan, while the rest of it was folded down over onto the floor.  That part on the floor was completely gone.

Friday, October 19, 2012

Work done around June 1st, 2012


Today we removed the fenders and windshield.  I think I may have mentioned in an earlier post that the fenders already went to Todd with other parts for straightening.  Obviously this was not the case since we just now took them off the car.  They were a pretty straightforward removal, not much trouble at all.  We also removed the fender extensions at this time.  While removing the fenders we only found two body panel shims, both of them on the driver’s side fender.  
The windshield was intact with no cracks but was badly scratched from someone using the wipers for what looks like years with no blades on them.  The windshield was gouged deeply across the entire surface.  With this being the case we weren’t too worried about getting the thing out in one piece.  We did try to though, for a minute.  J  The trim came off easy, once again dad did it while I was earning my grocery money.  He worked from the outside, and I laid on my back inside the car and pushed with my feet.  Very slowly, we had it started and it was coming out, but I got a little greedy with the feet pressure and it started to crack.  So out it came, crackin and poppin, and into the trash can.  
 
Here you can see the deep scratches from the wiper blades all the way across the windshield.

 
Windshield out.  Good thing it was going in the trash to begin with.
 

Me taking off the rear view mirror.
 

No more fenders, and soon all that junk hanging there there be gone as well.  Actually the original disc brakes were really nice.  Just one more thing I will be selling to those folks who are building an "All Original Car"

Work done around May 28th, 2012


Removing interior—We have been working on getting this old interior out, stripped, torn down, removed!!  This is a fun job, there is a lot of history held inside of these old cars.  Interesting to see what you uncover in all the hidden areas, under the back seat, under the carpet, behind the dash…mostly I was really interested in finding that build sheet.  Hoping  the whole time that it was tucked safely up in the springs under the rear seat, but alas it was not.   Its home was under the carpet in the front passenger side floor pan which was all but rusted through.  So you can imagine the condition of the build sheet, only the corner that was up on the seat pan had survived the 20 year stint of sitting outside with leaky cowls.  So I took a few pics and saved the remains.

The interior really came out easy, I think mostly cuz dad did alot of the work while I was at my day job.  I did get to help some though and the main dash frame was the toughest to get free.  Hidden bolts are very tricky.  You just can’t remove them if you can’t find them.   The sneaky guy I’m talking about is the one hidden under the bracket above the brake pedal assembly. 

 I’ve stripped the old seat covers off the front seats already and have new seat covers I bought twenty years ago.  (that will be a winter project working inside)  I do think I will get new seat foam as well, these really aren’t in too bad of shape but I think the covers will better fit the new foam, fewer wrinkles, fuller fit.  The back seat is in great condition and I will be using black dye to color that and all the other interior pieces that are of non-metallic manufacture.  New headliner of course, a lot of new parts inside actually.  So many in fact that I’m sure I couldn’t list all of them now.  Another note on the back seat…since I have added two inches to the inner wheel houses there is less room for that back seat.  I will have to figure out something for that, I have no plan just yet.  I was just hoping to deal with it somehow when it comes time.  I know that’s not the best approach but I’m not too worried about it.

The wiring harness is scary bad, it has been tapped into a few times up under the dash for what I have no idea.  Several areas of the harness in the engine bay is long gone, meals for the local rodents.  I am still debating on it, but leaning towards using some Painless wiring.  Just wish the price were lower.

Once again, as with everything else we have removed, things are cataloged, and marked for future identifying. 
 
The dash pad had been removed years ago to try and trace down a non-charging issue.  Never found it.


There's the dash pad.  The back seat is in really great shape.  Still strong and no rips or tears at all.  It will be getting used again.  Maybe...as I mentioned earlier, the inner wheel houses are more narrow now so we shall see.
 

These guys will need some love!  Several options here, not sure which way I'm gonna go yet.  I do know the interior will be black though.

There's dad working on door panel and door guts.  This shot is actually earlier since we removed the doors previous to all interior removal.

Dad again, showing off his big guns.  Not even sure he unbolted that seat.

This is later, but it's all that was left inside for awhile, time constraints and a few tricky, hidden bolts kept us from getting this thing out.  Notice the previous fiberglass repair on the driver's side floor pan. Somebody had also squirted some caulking or something down into the cowls in an attempt to stop them from leaking.
 

Thursday, October 11, 2012

Work done around May 26th, 2012

We’ve been working to remove the engine, transmission, gas tank, tail lights and a few other parts. This was a fun juncture, just seeing that Cleveland come out of the engine bay gets me excited to start rebuilding it, but I know we have a lot of other work that needs to come first. Very anxious to get that thing back in the car and running!!! Planning on a strong street engine type of build. (400hp or so??) Very streetable, but plenty of torque. Pretty sure we can do that with very few problems, they can roast the tires when bone stock so with a few added goodies I’m sure it’ll be just the right amount of fun for these streets.

The original FMX tranny will not see service again in this car, it’s gonna be a 5 speed all the way. That was a fun chunk to remove from the car. Whose damn idea was it anyway to build these things this heavy?!?! The rear gear set was changed out several years ago by dad and we’re gonna try that combo to see how it works with this build. 3.55 is the spinning rate for this 9 inch, stock gears were 2.70 or 2.79, I can’t really remember that far back.
 
Ready to come out, rat's nest gone...sorta.  There were still a bunch of rocks all down in and around lower engine, steering, tranny, and exhaust.  Amazing what a rat can do.

That is a 351C, 4V factory original engine.  Factory original FMX tranny.  When it goes back in it will have 2V heads on it for street performance and a T5 tranny backing it up.  

Dad being mechanical...

We bumped a few times on the way up and out, but over all the removal was pretty straightforward.  We removed the engine and transmission as a unit, much easier this way with all the room we made for ourselves. A very heavy block with the transmission.

      Home free, just need to unbolt the tranny and get it on the engine stand now.            That FMX is one very heavy unit!!

Resting at peace for now. Currently it has a sheet over it to protect it from debris but will soon be torn apart.

Yes, we made a mess with the tranny fluid, the bag we tied on the output shaft did not hold very well.

"We're Getting close" as dad says.  Yes we are.

View of the driver's side shock tower with a large crack in it.  This had always bothered me as to how we would repair it but now, it's just gone.  No more shock towers.        Also you can see some of the debris left behind by the rats.

Tank was a mess, even twenty years ago when I was driving it there was sludge coming off the inside of the tank playing hell with the carb.  No fun taking that apart every week.  And to make room for the exhaust idea I have, the tank will not be going back in the original spot.  That is all I have to say about that...for now.


Passenger side quarter, eh not too terrible.  Some rust repair but manageable.

Driver's side quarter, pretty darn terrible. Before I got the car it took a good hit directly from the side and it had an ugly repair job with about 8lbs of Bondo.  Plus tons of rust as well.  Both quarters will be replaced with half panels.

Jumping ahead a bit, this is what the engine bay looked like cleaned out.  Before the cutting wheel.
 

Wednesday, October 10, 2012

Work done around May 11th, 2012


Recently me and dad have been taking apart the mustang. Starting the restoration process, and I’m trying to identify as many parts, pieces, hardware and such as I can. Marking them and storing in Ziplocs.     Yes the bumpers will be painted as well.


Actually I had already purchased another hood from a swap meet years ago as the original had too much rust through, including into the substructure. The same goes for rust on the trunk lid but I just bought a reproduction for that. The rear valence is quite usable but will undergo some major changes or possibly some new sheet metal custom fabbed to fit my ideas. This is just one aspect of the overall plan that I will get into and try to describe soon. (I will talk a little more about all the ideas for this build once I get caught up to date on current progress, which is several posts out yet.)

IThere is a lot to do there, a lot of straightening and rust removal. This should keep him busy for awhile, but as it turns out I will be much slower in the readying of the body shell.  In fact, me and dad are still working on this part of the project, trying to do as much as we can as quickly as we can. Seems we’re really not all that quick when it comes to sheet metal and structure work, but we’re having a good time doing it!


Dad working on getting those bent hood hinges off.  I'd sure like a pair of billitt hinges but just can't really justify the price range there. I'll be figuring out something else there.

 
Dad working inside the door panel, removing the guts.  I have no idea how he got his arms in there, I know mine would barley reach to unbolt all the items inside the bowels of the doors.  What a job, really dreading that one going back together.

 
Over all shot without the doors and hood, just getting started.

 
First load of goodies.

 
There are a few minor twists up front where it took a little hit or two at some point in it's life.  Some vey minor bracket straightening will be needed. That is dad's El Camino in the background.  It's covered right now and raised up on the lift since we have been doing so much grinding and dirty work.

 
A few parts to go into the pile.  A few will be getting reused, a few others are just not up to the task of being called on again.  Those that are not reused will be getting sold on Ebay.

 
Trunk lid and tail lights off.  The rear will be getting a bit of a redesign, both inside and out.  I just gotta scratch that itch.

 
Parts is parts...
 

Thursday, October 4, 2012

Day 1


Moving the Mach into the shop from the field did take a little bit of work since it had been sitting there for several years in the same spot and was quite settled into its role of sundial and varmint homestead.  Dad’s tractor would be called in to action to aid with this task.  Actually the tractor did most of the work.  We wrapped a heavy strap around under the front bumper supports and the loader on the tractor then lifted the front end of the car while dad pulled the car around to the front of the shop.   Then we pushed the car back into the shop, the tires were still at least half full of air after sitting all this time.  (ok, it really wasn’t this easy)   This is not actually the only field the car had sat in, but this latest pony corral had seen it for about 8 years at least.
With the car in the shop one of the first things we did was pop the hood; again.   What a mess!!  Rat city!!  Actually the Mach’s latest inhabitants were rabbits who had gained control of the apartment complex under the hood.  It made a nice nesting area with the carb removed years ago for some reason.
That first day was getting the car moved, taking a little inventory, sitting in the car looking around, pondering what and where to start.  I snapped some pics of the car as I knew I wanted to document this rebuild very well, and would most likely need them to get things back the way they were.  Reference photos.  Lots of ideas and future plans were discussed that day between me and dad.  How we’re gonna do this, how we’re gonna do that.  Oh, the possibilities!
                                  Nice shot of "Engine Bay Deluxe Apartment Towers"

                                           As you can see they had a luxurious suite.


   It had taken a hit on this quarter and had a few pounds of filler here. It will need replaced with all the damage and rust.


                               Another replacement prospect with al the rust hard to see damage.


Hmmm... guess the back end took a hit sometime too. I see alot of replacements coming.  How do you like those shackles hanging down there??  Nice huh?  Also the factory rear louvers are on the shelf in the corner already.


Yes, more rust and more parts to buy.  Over all for sitting outide for this many years the thing really wasn't in too bad of shape. Could have been alot worse.  Now lts see what the interior is looking like. 


Factory blue, which will be making the change to black.  Right, not stock.  The original dash pad is in the back seat and the new dash pad I bought twenty years ago is still in the box on the shelf, along with the new seat covers.
 
 
There's that dash pad.  Just how much of this original interior will be used remans to be seen, but I will be trying to utilize as much as I can.
 
 
I guess as an overview it is really not terrible considering the time it spent in the weather.  As you might imagine the floor pans are toast and included with that was the unfortunate find of my build sheet under the front floor pan carpet instead of tucked up under the rear seat.  Toast would be a good word for it as well.

Ideas...


I have owned this car for 22 years now and have never really stopped thinking about what it would be like when it is restored.  I never really planned on making a concourse correct car, or even coming close to that achievement.   My early plan was to make a nice, solid, strong running weekend driver.   I even had the color picked out which at the time I called “safety yellow”.    GM has produced this color for me now so there will be no guessing involved when it is time for paint.  Velocity Yellow is what they call it, and it can be seen on more and more cars lately. Hopefully that little fad will phase out soon, as one of the reasons I wanted this color is it was not too frequently seen.  
So, enter the 21st century and so many advances have been made in the way of upgrades for our classic cars that I am way behind on the subject.  I’m happy just to get this car inside the shop with a burst of energy to make something happen. 
Like I said I had never planned on building a stock car, in looks or otherwise.  Original parts would be used where they survived to be used again, but I am not afraid of reproductions or fabbing my own stuff. 
So, without giving all the details I will say this about the design of the restomod—it will be a mild pro-tour type car.  Meaning it will have many modern upgrades over the stock configuration without being full on Pro Tour.  I plan to keep a few of the Mach 1 monikers just to let someone know what it is, while containing my own formula of what I like.  So please follow along as I describe the work me and dad are doing and will do along the way.   Hope you enjoy!!

Monday, October 1, 2012

Early Recods..


My early records were somewhat short and sweet.  Nothing much to talk about, just a date, a few short lines and maybe a price associated with the latest work being accomplished.  For example it started this way:   Sept. 4th, 1990   /   Purchased Mustang Mach 1 from Steve xxxxx   /    $2250.00

That’s it, that is the way it began.  I’ll run down through a few of them until I get the time when the new restomod started.

·         Quick cleanup and detail on engine compartment.
·         Replaced water pump, fuel pump, & rebuilt carb.
      ·         Drove once a week until Engine stopped charging.
·         Alexandria Nicole Ball Born 7lbs. 9 oz.
·         Opened the hood a few times just to look.
·         Battery is dead.   January 1992
·         May 7th, 2012—Moved car into dad’s shop to start resto.  Wow!!!  Really??

I had made a special form with several blank copies of the same page to fill in over the years of restoration.   I kept these records in a three ring binder along with any receipts or other information I deemed pertinent.  This binder still exists today and I still add to it, but it will remain short worded for it has limited space.  Seems I wasn’t doing a very good job with the records, but that is because I was not doing anything with the restoration.  I had ordered the original invoice back when Lois still held them and sold them, and this is also kept in the binder.   Not sure of the exact date, but it had to be along 1991 or so.   I will do most of the talking on this blog, showing several of the pictures I have taken along the way to the finish line and stories to go with.